 1
1Production flaws
The Hradčany stamps were produced in 1919 in haste, on makeshift equipment and on whatever paper was at hand. The traces of that haste are still visible on the stamps. This page collects the production flaws of the 15h value — deviations that arose while the sheet was being made, not damage suffered after issue. They are arranged by production stage: paper → printing → perforation. How that process ran, and why it produces these particular deviations, is explained on the Letterpress page.
A production flaw is not the same as a catalogue variety. The perforation groups A–H, the drawing types or the shades describe with what and how a sheet was made, and they are regular. A flaw is a disturbance of that same process — random in most kinds, tied to a particular place on the plate in some (white spots). Constant plate varieties, which recur on the same stamp field, belong to plate reconstruction — see the position gallery.
- Perforation flawsDouble perforationMissing perforationPerforation shifts
- Printing flawsPartly doubled printDouble and multiple printWandering ringsSmearsBlank spotsThin print with ink spotsFilled-in printPrint and set-off on the gumTorn-off ink
- Damage to the printing plateCracked plate — 11/IIDamaged frame — 60/VI
- Paper flawsCreased paperSplinter in the paper
Perforation flaws
Perforating was the last operation and at the same time the one most prone to error. In line perforation every row of holes was applied separately, so a whole sheet was built from dozens of strikes whose accuracy rested on the operator. Hence two opposite flaws: a row too many, and a row missing.
Double perforation
A chapter of its own are copies where the perforating tool passed through one and the same gap twice. Depending on how far apart the two strikes fell, the result looks entirely different: with a small offset the holes overlap and the teeth are left ragged, with a larger one two clearly separated rows appear with a band of paper between them. Both forms are recorded in the collection.
Specimen 1 — two closely offset strikes

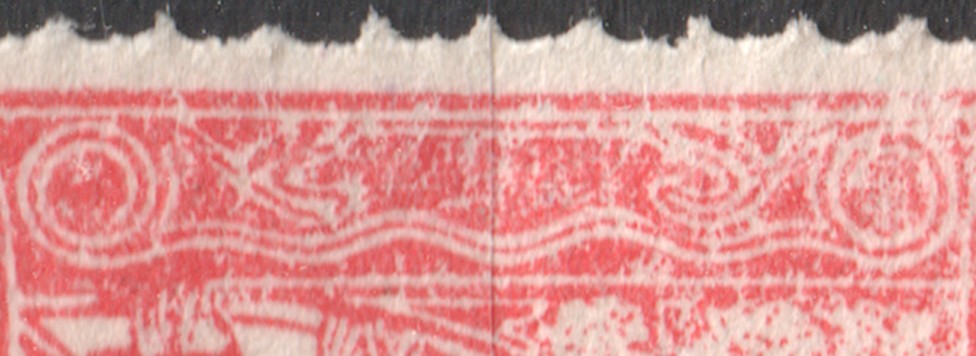
On this copy the second strike caught both vertical sides, and only a fraction of the gauge separates it from the first. The rows are therefore out of register by a little: the holes partly overlap and the teeth left between them are narrow and ragged. Along the side, teeth of normal width alternate with conspicuously thin ones and the depth of the cuts varies; in the enlarged detail one can see pairs of closely adjacent holes separated by nothing but a thin strip of paper.
Specimen 2 — two separate rows along the bottom
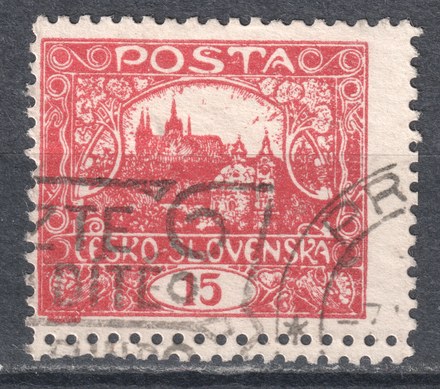
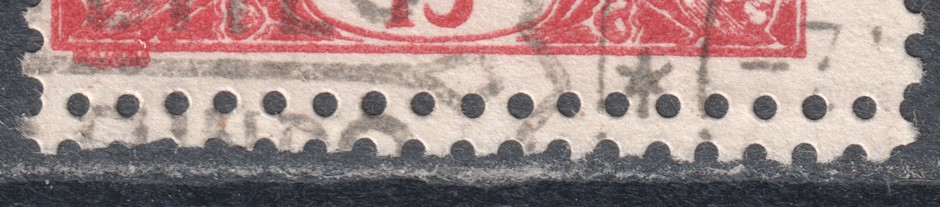
The copy is identified as field 100 of the third printing plate — the bottom right corner of the sheet, that is, the last row. Here the bottom side was punched by two separate rows of holes one above the other, offset by less than one hole spacing, so that they did not interleave but lie side by side as two parallels. The stamp was separated along the lower of them — that one has the ordinary toothed profile — while the upper row stayed whole: it lies untouched in the margin as a continuous line of round holes, because nothing was torn along it. That is what makes the copy valuable. An unbroken row of holes inside the margin can arise from nothing but a second pass of the tool, so the flaw evidences itself — unlike ragged teeth, which can be mistaken for careless separation.
Specimen 3 — the second row cuts into the design
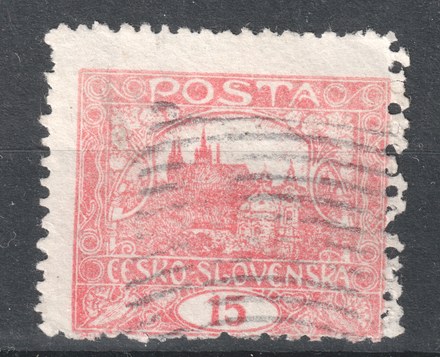
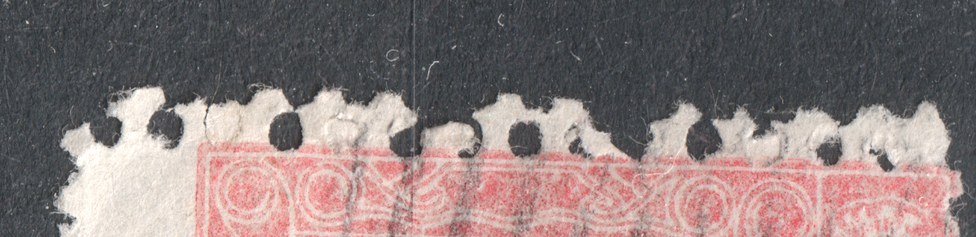
The third copy, identified as field 38 of the second plate, combines the two earlier forms. Only the right vertical side is doubled: the outer row is the one along which the stamp was separated and has the usual perforated profile; the inner row lies just under a millimetre closer to the centre and stayed intact — an unbroken run of round holes that bites into the right frame of the design. The offset of the two strikes is therefore larger than on specimen 1 (the holes do not overlap) and smaller than on specimen 2 (no strip of clean paper was left between the rows). That the second row reached into the print is connected with the overall leftward shift of the design on this copy: the right margin is unusually wide, and a row meant to fall in the middle of the gutter landed in the picture. The gauge of both rows is the line gauge 11½, i.e. perforation D — and since the doubled side is vertical, this is once more a double application of the line perforator, as on specimen 1.
How the flaw arose
The essence is the same on both specimens: one and the same gutter received two strikes. This can happen with either of the tools used on the issue, but each gets there by a different route — and the two specimens on this page show precisely those two routes.
- A line perforator punches one straight row of holes across the whole sheet; the sheet is then advanced by the size of one stamp and the tool strikes again. A whole sheet is thus built from dozens of separate strikes and the accuracy rests on the operator. If the sheet slipped, was laid in a second time, or the operator lost track of which gutter had already been punched, that gutter receives an extra strike — and since the vertical and horizontal rows were done in separate passes, it can be any of them. This fits specimen 1: both vertical sides are doubled and the offset is so small that the holes overlap. Specimen 3 arose the same way — there the extra strike caught only the right vertical side, a little closer to the design.
- A comb perforator punches three sides of a whole row of stamps in one stroke, after which the sheet advances by one row. If that advance fails — the sheet moves too little, or slips — the horizontal part of the comb lands in a gutter the previous stroke has already punched. A doubled horizontal row results, while the vertical sides stay sound, because those are made by the vertical prongs of the comb. That is exactly what specimen 2 shows: two rows one above the other along the bottom, and the vertical sides untouched. Its place in the sheet fits as well. The specimen comes from the last row, and the bottom edge of the last row is closed by a separate final stroke of the comb — the one gutter a stroke merely closes instead of opening the next row at the same time. A repeat of that particular stroke therefore shows exactly where it is seen.
The direction of the doubling therefore hints in itself at which tool was at work. A doubled vertical side points to line perforation; a doubled horizontal row with the vertical sides untouched matches a failure of the advance under a comb. On specimen 2 the gauge confirms it: it is coarser than on specimen 1 and matches comb perforation B. Identifying the copy as field 100 of plate III settles it — the comb struck twice there, with a very small offset.
A double perforation is not a catalogue perforation of its own. Groups A–H describe the kind of tool and the gauge, that is, what the sheet was punched with — a repeated pass of the same tool does not change the gauge, and the stamp is identified from the row that corresponds to the proper pass. It is recorded as a perforation deviation: sought after by collectors, but outside the catalogue arrangement. It is easy to tell apart from the exceptional perforations I and L — there each side carries a single row of holes, merely at a different gauge from the opposite side, whereas in a double perforation one and the same side carries two rows.
Missing perforation
The opposite of a double strike is a pass that never happened at all. An unbroken band of paper is then left between two rows of stamps and the sheet cannot be torn there. The stamps had to be separated with scissors or by tearing, so the finished copy has one or more sides that are smooth, without teeth — and the remaining sides perforated as usual.
Specimen 1 — horizontal perforation missing


Both horizontal perforations are missing: the top and the bottom side were separated with scissors, while the vertical sides are perforated normally. That the cut ran between two stamps is betrayed by the bottom edge — a piece of the neighbouring stamp's frame is still visible on it. Two consecutive horizontal rows were therefore skipped, which with a line perforator means the sheet passed through without a strike twice in a row.
Specimen 2 — vertical perforation missing

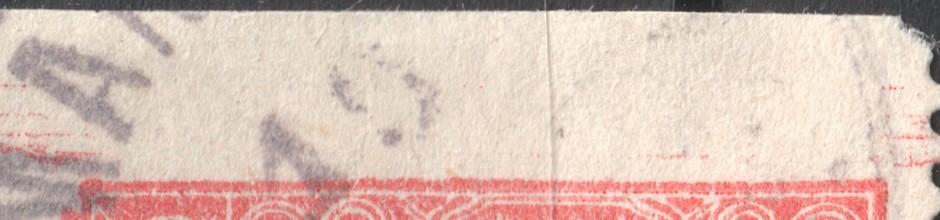
Here a single vertical row is missing — the left side. The top, bottom and right sides are perforated. The wide smooth margin on the left carries faint traces of red ink from the neighbouring stamp, so here too the cut ran through the open gutter between two stamps. That makes the copy self-evidencing: had the margin merely been trimmed, paper would be missing from it, not left over.
Specimen 3 — top perforation missing


The third copy is the most telling of the three. The top horizontal row is missing; the left, right and bottom sides are perforated. The wide top margin retains the frame and part of the lettering of the neighbouring stamp — the cut therefore did not run down the middle of the gutter but reached into the design of the stamp above. Such a margin is at the same time the best proof of genuineness: extra paper carrying someone else's print cannot be obtained by trimming teeth away, only by the perforation genuinely having been absent there.
Beware of confusion. The issue also appeared imperforate, and there all four sides are smooth — with a missing perforation at least one side must remain perforated. The flaw can also be faked by trimming the teeth away, so the width of the margin is judged on every copy: a trimmed edge is narrower than normal and traces of the holes tend to remain. For the more valuable combinations (perforation missing on several sides) a certificate is in order.
A related topic: the shift of the perforation against the design. It is not a failure of the tool but an inaccuracy in laying the sheet — so common on the Hradčany issue that it has a part of its own: Perforation shifts.
Perforation shifts
Perforation was punched into the sheet only after printing, as a separate operation on a different machine. The position of the perforating grid relative to the printed design was therefore never fixed, and on the Hradčany issue it departs from the ideal unusually often. The specimens below come from a single collection — 29 items, 30 stamps in all — and cover the whole range, from barely noticeable unequal margins to copies where the perforation runs through the design and a strip of the neighbouring stamp remains at the edge.
Why shifts happen
- The sheet was laid into the machine by hand against stops. Any inaccuracy in laying it shifts the whole perforating grid at once — which is why all the stamps of one sheet tend to be shifted the same way.
- With line perforation each line is punched separately and the sheet is advanced between them. The error of one advance adds to the previous ones, so the deviation grows towards the opposite edge of the sheet; and the two directions were done in separate passes.
- With comb perforation one stroke serves a whole row, so within the row all ten stamps are shifted alike. Irregularity appears only at the boundary between two rows, where two strokes failed to meet.
- Nor is the design itself always in the same place on the sheet. The position of the forme could vary slightly, and such a displacement of the print relative to the sheet edge then adds to that of the perforation.
- The issue was produced in 1919–1920 under makeshift conditions, in haste and on several different machines. An imperfectly set or worn tool and fast working are why shifts are considerably more common on the Hradčany issue than on later ones.
Degrees of shift
- Slight — the margins are of unequal width but the frame stays intact. The commonest state; a question of centring rather than an interesting variety.
- Medium — the perforation reaches into the frame or runs through it. The design is damaged, but nothing of the neighbouring stamp is yet present.
- Strong — a strip of paper with part of the neighbouring stamp's print remains at the edge, or conversely part of the stamp's own design is missing. Such copies are the most telling, since they show directly by how much the grid missed.
A shift is not a plate flaw. It does not arise in the printing plate but during perforating, and therefore does not repeat on the same sheet position — it cannot be used to identify a plate or a position in the sheet. For gauging, however, it is useful: on a shifted copy you can see how far from the frame the row lies, and on a pair or strip whether the perforation is line or comb.
Care with striking copies. A strong shift adds collector appeal, so it is worth checking that the perforation is original: compare the gauge with a documented type of the same plate, and check that the shape and length of the teeth match the stamp's other sides.
Specimens from the collection
The direction is always given as the displacement of the perforating grid relative to the design: shift to the right means the perforation lies further right, leaving a narrow margin on the left and a wide one on the right. Click a specimen to enlarge it.
1Perforation shifted to the right — on the left the row runs hard against the frame, on the right a wide margin remains.
 2
2The horizontal row above was punched high, inside the neighbouring stamp: an extra strip of paper with a trace of its print remains at the top. Horizontally the shift is to the left.
 3
3Marked shift to the right and downwards — on the left the perforation reaches the frame, on the right and below a very wide margin remains.
 4
4Shift downwards — the top row lies right above the frame, a wide margin remains at the bottom.
 5
5Diagonal shift to the right and downwards, by roughly the same amount in both directions.
 6
6Shift to the right and downwards; the top row passes right at the frame, while the bottom margin is wide.
 7
7Horizontally well centred, but both horizontal rows lie close to the frame — there is unusually little room between them.
 8
8Shift to the left and upwards — the bottom row reaches the frame.
 9
9Shift to the left and upwards; below, the perforation almost touches the frame, while margins remain at the left and top.
 10
10Strong diagonal shift to the left and upwards — on the right and below the perforation passes hard against the frame.
 11
11Shift to the right, only slight vertically — a wide margin at the right, a narrow one at the left.
 12
12Shift to the right and upwards; the bottom row lies right below the frame.
 13
13Strong shift to the left — on the right the perforation runs through the frame, on the left a strip of the neighbouring stamp remains at the edge.
 14
14Strong shift to the right — the frame is cut on the left, and a strip of the neighbouring stamp's print remains on the right.
 15
15Shift to the left and upwards — on the right the perforation runs through the frame, margins remain at the top and left.
 16
16Very strong shift upwards — a wide strip of blank paper above the design, the bottom row lying hard against the frame.
 17
17Strong shift upwards; a trace of the neighbouring stamp's print is visible along the top edge.
 18
18Shift to the left and upwards — below, the perforation reaches the frame, above a wide margin remains.
 19
19Horizontal pair. The vertical row between the two stamps is shifted to the right: the left stamp has an unusually wide right margin, while the right one has its left frame cut. Both outer vertical rows also run hard against the frames.
 20
20Extreme shift upwards — nearly half the paper above the design is blank, while below the perforation runs through the design.
 21
21The most telling item of the group: the horizontal row was punched deep inside the neighbouring stamp, so its entire lower edge — value oval 15 included — remains at the top. The stamp's own design is cut at the bottom.
 22
22DOPLATIT 40 h surcharge. Strong shift to the left — the frame is cut on the right, a strip of the neighbouring stamp remains on the left.
 23
23Shift to the right and upwards — on the left and below the perforation passes hard against the frame.
 24
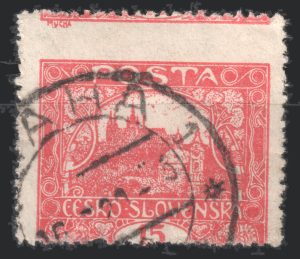
24Strong shift upwards and to the left; a trace of the neighbouring stamp's print is visible along the top edge.
 25
25Shift to the right and upwards — on the left the perforation passes hard against the frame, at the top an extra strip of paper carries a trace of the neighbouring stamp's print.
 26
26Shift to the right and upwards — on the left the row reaches the frame, at the top a wide margin remains with a trace of the neighbouring stamp's print.
 27
27Shift to the left and downwards — on the right the perforation runs through the frame, on the left a trace of the neighbouring stamp shows at the edge.
 28
28DOPLATIT 40 h surcharge. Strong shift to the left and upwards — a strip of the neighbouring stamp remains on the left, the design is cut on the right.
 29
29Shift to the right — on the left the design sits hard against the perforation, on the right a wide margin remains with a trace of the neighbouring stamp.
Printing flaws
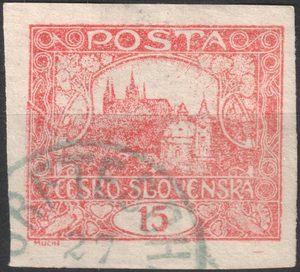
Partly doubled print
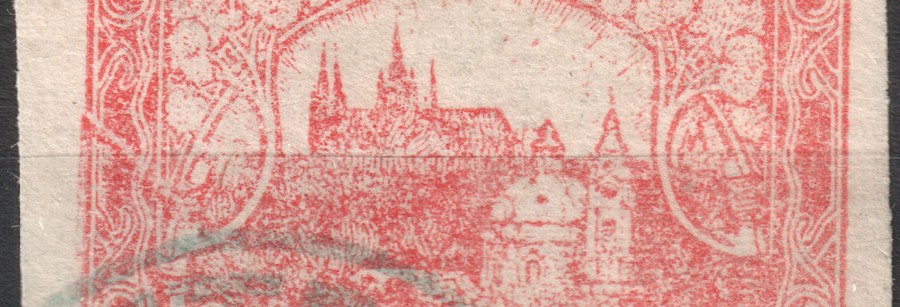
On these stamps the design is divided into two parts by a straight horizontal boundary. Above it the impression is clean and sharp, below it heavier, smeared and in places doubled — the outlines repeat, displaced by a fraction of a millimetre. The boundary is ruler-straight, has nothing to do with the design and continues into the side margins of the stamp. On all five recorded copies it lies at roughly the same height.
How the flaw arose
The cause lies under the sheet, not in the printing plate. During printing a foreign object found its way beneath the sheet — most likely another piece of paper: an underlay, a spoiled sheet, or a folded corner of the sheet itself. Its straight edge lifted part of the printing surface, and from that moment the sheet was printed at two different heights.
- The raised part met the forme sooner and under greater pressure than the press was set for.
- Under that excess pressure the paper shifted slightly on the forme and the impression smeared or doubled — which is why the outlines repeat only a fraction of a millimetre apart.
- The rest of the sheet lay at the normal height and printed cleanly.
- The transition between the two is therefore as straight as the edge of the sheet that caused the lift. It follows the foreign object, not the design — which is exactly why it runs on regardless of what is printed beneath it.
- That this was a one-off situation at the press is supported by the boundary lying at the same height on all four copies: it fits stamps from one row of the sheet, the row the edge of the underlying paper crossed.
Why this is not a cracked plate
Copies of this kind turn up in offers as a “cracked printing plate”. That is a mistake, and the two are easy to tell apart:
- A crack adds ink. Ink collects in the fissure, so it prints as an extra line. Here nothing has been added — the design is the same on both sides of the boundary, only the quality of the impression differs.
- A crack is constant. It belongs to one stamp field, recurs on every further sheet and grows over time, so it can be divided into stages. A smeared area recurs nowhere — it arose in one particular pass of the press.
- A crack belongs to the plate, this boundary to the paper. The division crosses design and margin alike and takes no notice of what lies beneath it; a crack, by contrast, always sits at a particular place in the design.
What real damage to a plate looks like — a coloured line, tied to a stamp field and staged over time — is shown in the Damage to the printing plate part, which includes the crack at 11/II.
Specimens from the collection
 1
1The boundary runs roughly through the middle of the stamp. Above it the print is clean, below it heavier and with blurred outlines.
 2
2The boundary at the level of the foot of the Castle. The lower part of the impression is softer and lighter, the upper part stayed sharp.
 3
3A heavily cancelled copy; the boundary shows as a horizontal division at the level of the towers, most legible in the right-hand part of the stamp.
 4
4The clearest item of the group. The straight boundary crosses the whole stamp and continues into the side margins; below it the outlines are doubled. The detail above is taken from this copy.
 5
5A copy with a legible cancel of 1 June 1920. The boundary runs just below the arch, at the level of the upper towers of Hradčany.
Double and multiple print
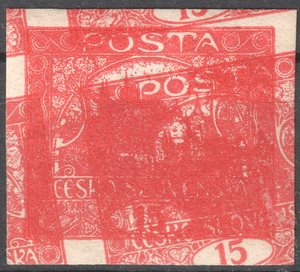
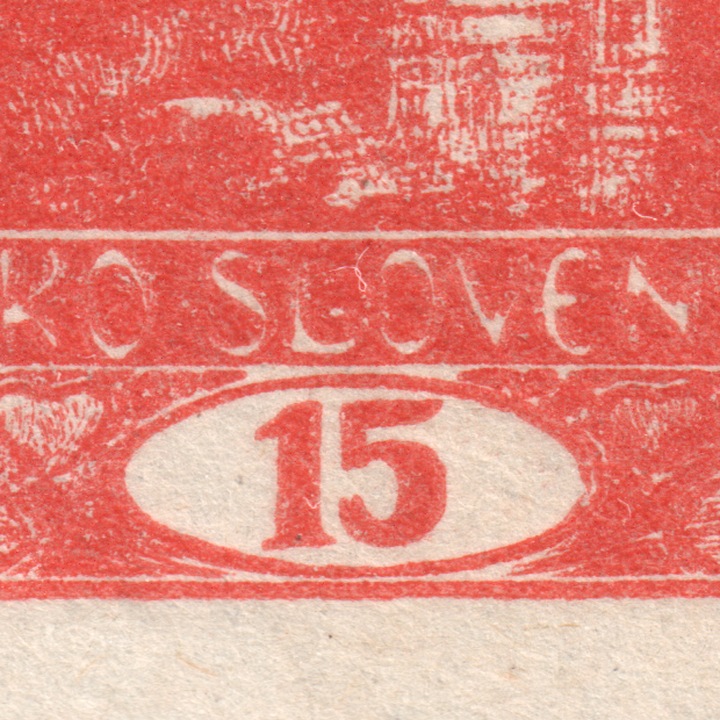
On these copies the sheet received more than one impression. The whole design is printed twice — once only slightly displaced, so that every line has its twin, and elsewhere displaced by a long way and rotated, so that parts of several impressions end up inside a single stamp.
How the flaw arose
The sheet went through the press a second time: either it was not taken out after the first stroke, or it was fed back in. Between the two impressions it moved — by a fraction of a millimetre when the register merely slipped, or by a long way when the sheet was laid in quite differently. Because the same forme does the printing, the two images are exactly identical in size and in detail; they differ only in position. That is also why a double print can be recognised reliably: the displacement has the same direction and the same size everywhere.
Degrees
- Double print — a displacement of tenths of a millimetre. At first glance the design merely looks blurred; only close up is it clear that every line, letter and outline of the oval has a fainter twin.
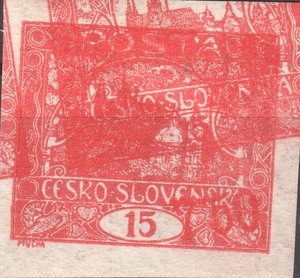
- Multiple print — a displacement of millimetres up to a whole stamp width, often with a rotation. Parts of neighbouring stamps then reach inside one stamp’s frame and the word POŠTA appears twice at different heights.
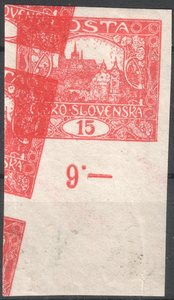
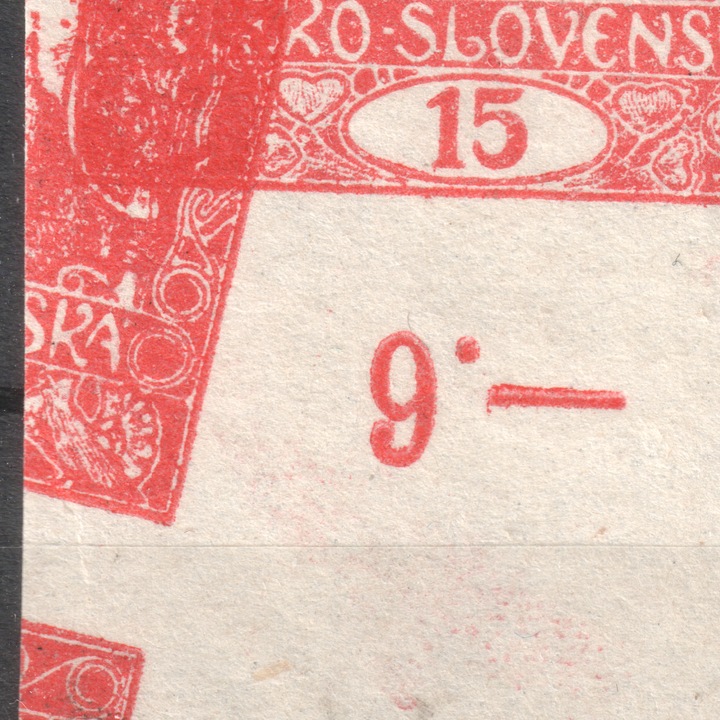
- On a piece with the sheet margin it shows best of all: the surplus impression lies on paper that should carry no design at all, right beside the control number.
Why this is not a partly doubled print
In a partly doubled print only part of the stamp is doubled and the change to the clean impression is a straight boundary — a foreign body under the sheet lifted that part of it. Here there is no boundary: the whole design is doubled right into the corners of the frame, because the sheet received a complete second impression.
Why this is not a set-off
A set-off is a transfer of fresh ink from another sheet: it lies on the gummed side and is mirrored. Both impressions of a double print are on the face and both read the right way round.
Specimens from the collection
 1
1Double print. The second impression lies only a fraction of a millimetre from the first, yet it shows on every line — best on the inscription and the value oval.
 2
2Multiple print. The impressions are displaced by a long way and rotated, so parts of neighbouring stamps reach inside the frame and the word POŠTA appears twice at different heights.
 3
3A corner piece with the sheet margin and control number 9. The slanted second impression runs across the margin — across paper that should carry no print at all.
 4
4Multiple print with rotation. The second impression is shifted up and to the right and turned by a few degrees: its inscription ČESKO-SLOVENSKÁ runs obliquely through the middle of the stamp across the Hradčany skyline, and at the top the bottom of a stamp from the row above reaches into the frame.
Beware of confusion with a smeared impression. If the sheet moved under pressure the design smears into a streak, but no second outline appears. In a double print the displaced copy is complete — it has sharp lines of its own and the same offset from the first everywhere.
“Wandering rings”
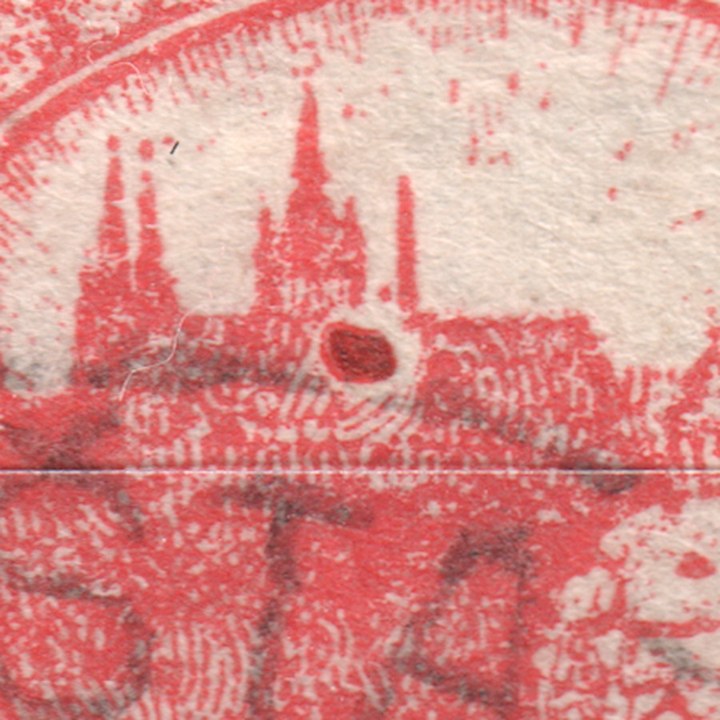
A small, sharply-bounded dark spot or ring appears where the design should stay clean white — in a gap between the towers, inside a letter of the inscription, under an ornamental ring of the frame. Unlike a plate flaw, its position varies from copy to copy: it is not tied to one stamp field.
How the flaw arose
A speck lodges on the inking roller or on the printing forme itself — a bit of dried ink, dirt, or a paper fibre soaked in ink. It prints only at that one spot on one sheet; the rest of the impression is unaffected. Depending on the speck's shape and size the result is either a solid spot, or — when mainly its rim made contact — a small ring.
Why this is not a smear (závoj)
A smear (závoj) comes from a blanket excess of ink on the roller or forme and shows up as ink spreading over a larger area of the design. A wandering ring, by contrast, comes from one isolated speck at one particular spot — which is why it is sharply bounded, small, and its position differs from copy to copy, while a smear stays where the plate's raised design is thickest.
Specimens from the collection
 1
1In the “ČESKO-SLOVENSKA” inscription, on the left.
 2
2In the left part of the Hradčany skyline.
 3
3In the left part of the Hradčany skyline.
 4
4In the middle of the Hradčany skyline.
 5
5In the left part of the Hradčany skyline.
 6
6In the left part of the Hradčany skyline.
 7
7A genuine ring below the castle skyline — see the detail below.
 8
8A solid spot in the gap between the towers — see the detail below.
 9
9In the lower ornament of the frame, right of the value oval.
 10
10In the lower ornament of the frame, left of the value oval.
 11
11In the upper part of the design, right of the “POŠTA” inscription.
 12
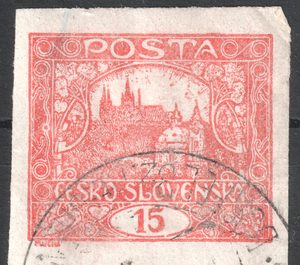
12In the left part of the Hradčany skyline.
 13
13In the left part of the Hradčany skyline.
 14
14A ring with a dark core and a light halo — at the right edge of the design, in the foliage right of the church towers, just above the inscription band.
Smears — excess ink
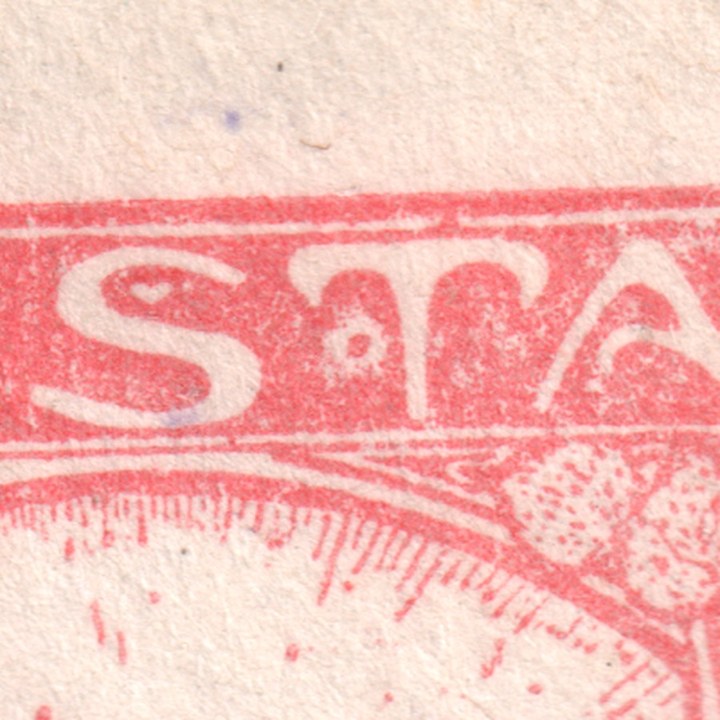
Instead of a sharp edge, the ink here spreads into a soft, blurred stain that runs on from a printed line or spills around a dense, raised element of the design — most often the small heart-shaped ornament in the corner of the frame. The stain has no clear boundary of its own; it fades gradually into the white.
How the flaw arose
The mechanism is the same as for a white spot, just at the opposite end of the scale — see the diagram at the start of this chapter. Excess ink on a raised element of the forme or roller spreads sideways under pressure. The denser and more raised the design is at a given spot, the more ink collects there and the more easily it spreads — which is why a smear turns up almost always at the same kinds of places: corner ornaments, heavy frame lines.
Why this is not a wandering ring
A wandering ring comes from one isolated speck, so it is small, sharply bounded and sits on its own in a white area. A smear, by contrast, comes from a blanket excess of ink on a raised part of the design and always runs on from it or spills out of it — it never sits in isolation and never has a sharp edge.
One of the recorded copies carries a collector's card referencing field 35/V. If the same smear recurs on this field on further sheets, it would no longer be a random production flaw but one tied to a particular plate field — the question is still open.
Specimens from the collection
 1
1In the lower ornament of the frame, right of the value oval.
 2
2Below the castle skyline, near the left edge.
 3
3In the middle of the Hradčany skyline.
 4
4In the middle of the Hradčany skyline.
 5
5In the middle of the Hradčany skyline.
 6
6In the middle of the Hradčany skyline.
 7
7Near the value oval with the figure 15.
 8
8In the right part of the Hradčany skyline.
 9
9In the middle of the Hradčany skyline.
 10
10In the left part of the Hradčany skyline.
 11
11In the middle of the Hradčany skyline.
 12
12In the “ČESKO-SLOVENSKA” inscription, on the left.
 13
13In the middle of the Hradčany skyline.
 14
14In the right part of the Hradčany skyline.
 15
15Near the value oval with the figure 15.
 16
16Near the value oval with the figure 15.
 17
17In the “ČESKO-SLOVENSKA” inscription, on the left.
 18
18In the middle of the Hradčany skyline.
 19
19In the middle of the Hradčany skyline.
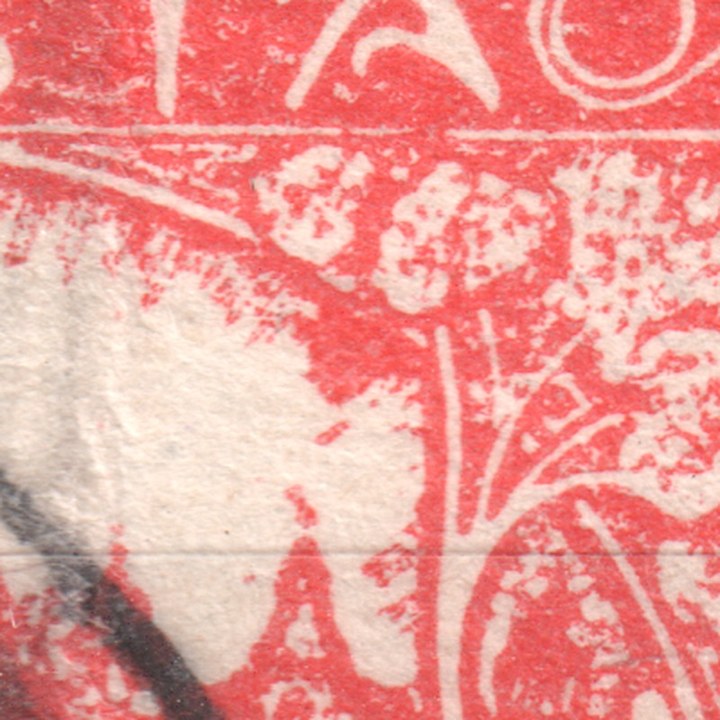

White spotsLocally weakened or missing print from a damaged or clogged place on the plate. Covered on its own page — white spots on plate I.
Filled-in printAn excess of ink closes the fine unprinted gaps of the design — covered below in this chapter: filled-in print.
Filled-in print
Here there is too much ink, not too little. The impression is saturated, but the design drowns in it: the fine radiating hatching of the sky merges into a continuous field, the silhouette of Hradčany is a dark outline with no windows or turrets, the texture of the hillside below the castle turns into a shapeless mass, the garlands and spirals along the sides of the frame run together into blots, and the letters of POSTA and ČESKO-SLOVENSKÁ are thickened, their counters half closed. Nothing is missing but the white between the lines.
How the flaw arose
Letterpress prints from the raised surfaces of the plate; all the detail of the design is carried by what was left recessed between them — narrow unprinted grooves, in the finest engraving only fractions of a millimetre wide. When the forme carries more ink than it can hold, or the impression pressure is too high and the packing too soft, the ink is squeezed sideways off the raised lines and fills part of those grooves. The narrower the groove, the sooner it closes — which is why hatching and hairlines go first, while the frame and the numerals merely thicken. The flaw therefore takes ink away nowhere; it only adds it where it does not belong.
The cause is the setting of the press, not the plate. It affects the whole impression at once and usually a whole run of sheets, until the printer adjusts the ink or the pressure; after that the same plate prints normally again. Filled-in print is therefore neither a catalogue variety nor a property of a stamp field — it is a state of one print run.
Why this is not a smear (závoj)
A smear is local: an excess of ink on one dense, raised element of the design — most often the little heart ornament or a heavy frame line — that spreads into the surrounding white and has a soft, blurred edge. The rest of the stamp looks normal. In filled-in print it is not one place that suffers but the whole impression at once, and the ink does not overflow anywhere — the gaps inside the design simply close.
Why this is not thin print
Thin print is the exact opposite: too little ink, of too thin a consistency, the impression pale to pinkish, and the losses lie where the design calls for colour. Here the ink is fully saturated and in surplus — the losses are in the white areas, where there should have been no ink at all. The two can nevertheless meet on one sheet, since both arise at the same point of the process, merely at opposite ends of the setting.
Why this is not a slipped or doubled impression
A slipped impression has a direction: the lines are smeared to one side, and in a doubled impression every line has a fainter twin at the same distance. Here the thickening is symmetrical — the line grows equally on every side and there is no second outline anywhere.
Specimens from the collection
 1
1Perforation B. The sky and the hillside below the castle are one continuous field, the castle a mere outline — the strongest piece of the group.
 2
2Perforation C. The garlands along the sides of the frame have run together into blots, the counters of the letters in ČESKO-SLOVENSKÁ are half closed.
 3
3Perforation A. The towers of Hradčany merge into the sky, the ornaments in the bottom band are shapeless.
 4
4Perforation B. A copy with a markedly thickened frame and inscription; no drawing is left in the sky.
 5
5Perforation B. The spirals in the border ornament have contracted into solid dots.
 6
6Perforation A. The impression is lighter, yet the design is just as filled in — colour saturation and filling-in are independent of each other.
 7
7An imperforate copy. The frame is thickened, the castle and the hillside have merged into one.
 8
8Perforation C. The ornaments in the upper corners of the frame have filled in into solid shapes.
 9
9Perforation B. The silhouette of Hradčany has no detail left, yet the value numeral is still legible — the heaviest elements hold out longest.
 10
10Perforation A. A heavily cancelled copy; the filled-in print is nevertheless plain in the lower ornamental band.
 11
11Perforation B. A milder degree: a hint of hatching can still be seen in the sky, but the fine drawing of the hillside is already gone.
 12
12Perforation B, overprinted 40 DOPLATIT. Evidence that filled-in sheets also reached the postage-due overprint issue.
 13
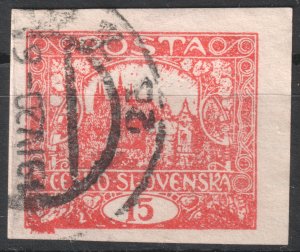
13An imperforate copy. The least filled in of them all — a good illustration of where the flaw starts: first in the sky and the hillside, only then in the ornament.
 14
14A vertical pair, perforation B. Both stamps are filled in to the same degree — the flaw came with the whole sheet, not with one field.
 15
15Perforation F (13¾ : 11½), plates I–II. A heavily filled-in impression — the left ornamental strip is a solid patch, the sky and the windows of the silhouette have vanished.


Filled-in crossbars — a type lost in the ink
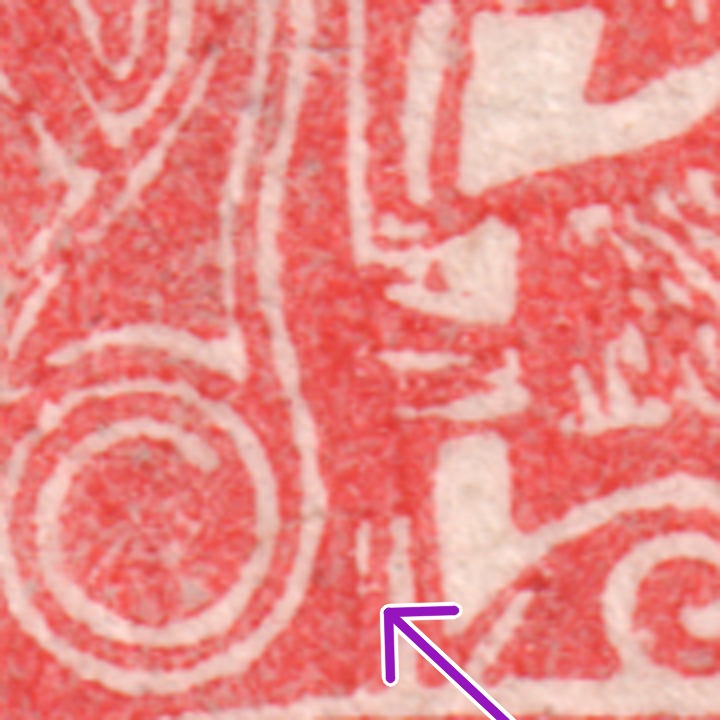
On some stamp fields the fifth design carries a so-called long crossbar (type IIp). It is a vertical unprinted stroke immediately to the right of the second spiral from the bottom in the left border ornament: on type Ip it stops a little above the horizontal line over the inscription ČESKO-SLOVENSKÁ, on type IIp it runs all the way down to it. The whole difference between the two types is thus a few tenths of a millimetre of white paper — and it is one of the narrowest white gaps on the entire stamp. That is precisely why filled-in print closes it among the first, and a copy from a long-crossbar field then looks as though it had no crossbar at all. Yet on the spiral, crossbar and frame types this difference changes the value of a stamp fundamentally.
The six copies in the gallery below are exactly such a case. Five of them come from fields 78/II and 5/I — both listed in the catalogue among the long-crossbar fields (see Fifth-design types). The crossbar is engraved in the plate, so it cannot be absent from an impression of that field; what is missing is not the crossbar but the white paper around it. The sixth copy, from field 83/I, is there for comparison: a short-crossbar field (type Ip) in a normally saturated print, where the ornament stayed legible.
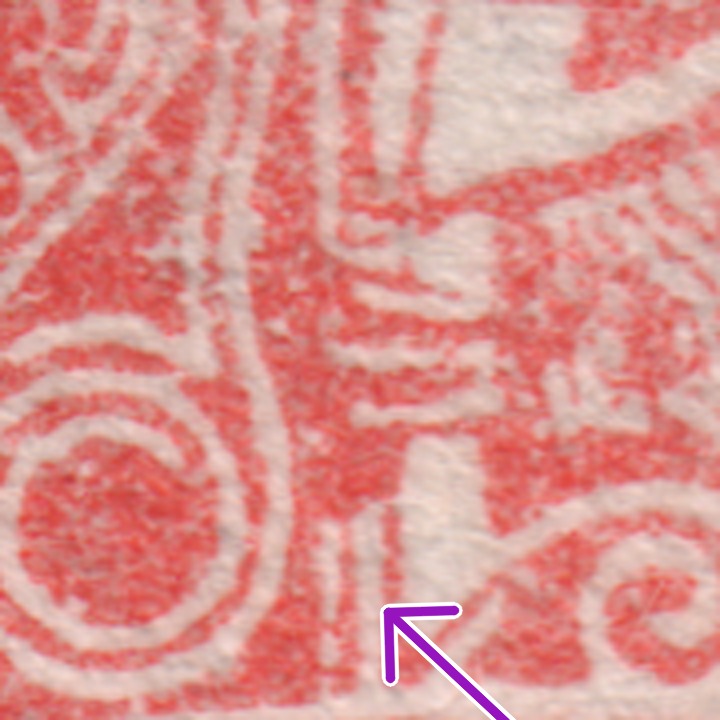
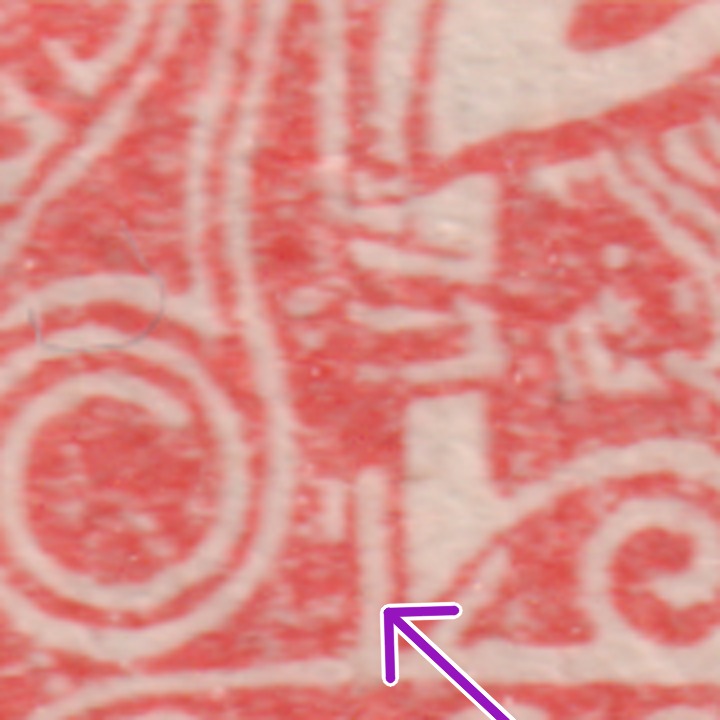
 1
1Field 5/I, imperforate. A long-crossbar field (IIp); on this copy there is no trace of the crossbar left in the ornament — hence it was filed as “without crossbar”. The most heavily filled-in copy of this group.
 2
2Field 78/II, perforation A. Also a long-crossbar field; of the bilingual datestamp only the month August is legible. The ornament beside the second spiral from the bottom has run together into a single mass.
 3
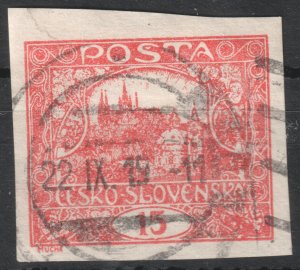
3Field 78/II, imperforate, cancelled 22 IX 1919. A second copy of the same field with the same result — the four copies of 78/II in this group point to a single sheet.
 4
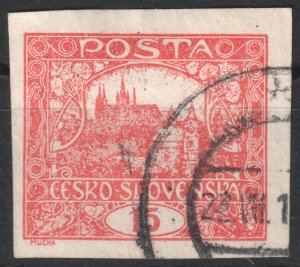
4Field 78/II, imperforate, cancelled 22 VII (year cut off). A milder degree of filling-in: the ornament is still articulated, but the crossbar can no longer be read — the detail of the ornament above is taken from this copy.
 5
5Field 78/II, imperforate. The fourth copy of this field; only a fragment of the cancel arc survives.
 6
6Field 83/I, perforation A, machine wavy-line cancel. A comparison copy in a normal print — a short-crossbar field (Ip), where the ornament is legible and the type can be determined with confidence.
A practical rule: never determine the type from a filled-in copy. Filled-in print can only shorten the crossbar or hide it altogether, never lengthen it — so a flooded copy may pass as a short-crossbar type (Ip) or as a copy with no crossbar, but it never fakes a long one. A missing crossbar on a field that carries one according to the plate reconstruction is therefore a printing flaw, not a variety.The same applies one step further: on a heavily filled-in copy even the stamp field itself often cannot be determined with certainty — the constant plate flaws by which fields are reconstructed are filled in along with the rest of the design.
Blank spots
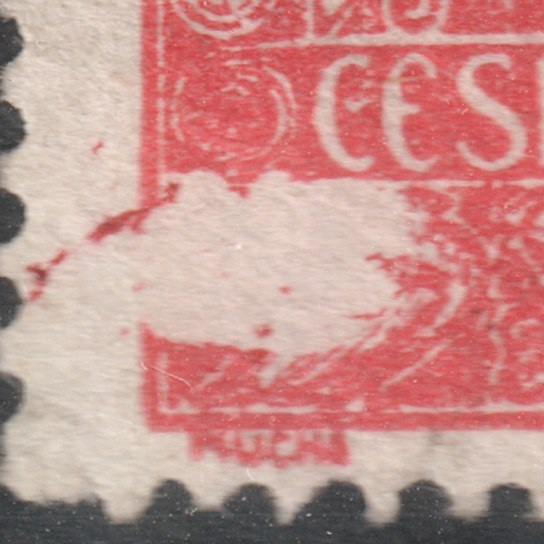
Where the print should be solidly inked, the colour is missing altogether — a blank spot has a sharp boundary and does not run on from any printed line or raised design element, the way a smear (závoj) does. Its position, size and shape differ from copy to copy and are not tied to one stamp field.
How the flaw arose
Between the inking of the forme and the impression of the paper, a foreign object settled on top of the already-applied ink — a speck of dust, a fibre, a small chip, or perhaps a hair. Being non-absorbent, the object sits a fraction of a millimetre above the ink, so at that one point the paper never actually touches it. The rest of the impression is unaffected; once the object shifted or was brushed away before the next impression, the flaw disappears with it — which is why the spot never repeats at the same place and turns up differently, or not at all, on other copies.
Why this is not a white spot (světlina)
A světlina arises from permanent damage or clogging at one specific point of the plate, so it recurs at the same stamp field on every impression — and its edge is soft, because the loss of ink develops gradually. A blank spot, by contrast, is a one-off: it was caused by a loose object that was gone by the next impression, so its edge is sharp and its position changes from copy to copy.
Why this is not creasing
Creasing arises from a fold in the damp paper before printing: ink is missing in the fold, but above all the design is displaced on the two sides of the fold and fails to line up, because the paper "stretched" once it was unfolded. With a blank spot the paper is entirely sound — no crease, no displacement of the design; only the ink is missing at one bounded spot.
Why this is not a splinter or a speck
A splinter or a speck is a foreign object pressed directly into the paper while it was being made, so it shows on both sides of the stamp — on the face it disturbs the print, on the back its outline is visible. The object that caused a blank spot lay only on the printing forme: the back is therefore completely clean, without any trace at all.
Specimens from the collection
 1
1A large spot in the bottom left corner, below the ČESKO-SLOVENSKA inscription — the most pronounced copy recorded.
 2
2A very faint, barely visible spot in the ČESKO-SLOVENSKA inscription and in the ornament to the left of the value oval — the faintest copy recorded.
 3
3A sharply bounded spot across the base of the castle and the letter L of the ČESKO-SLOVENSKA inscription — the letter disappears completely.
 4
4A diagonal spot across the towers, the inscription and the value oval, partly hidden under the cancel.
Thin print with ink spots
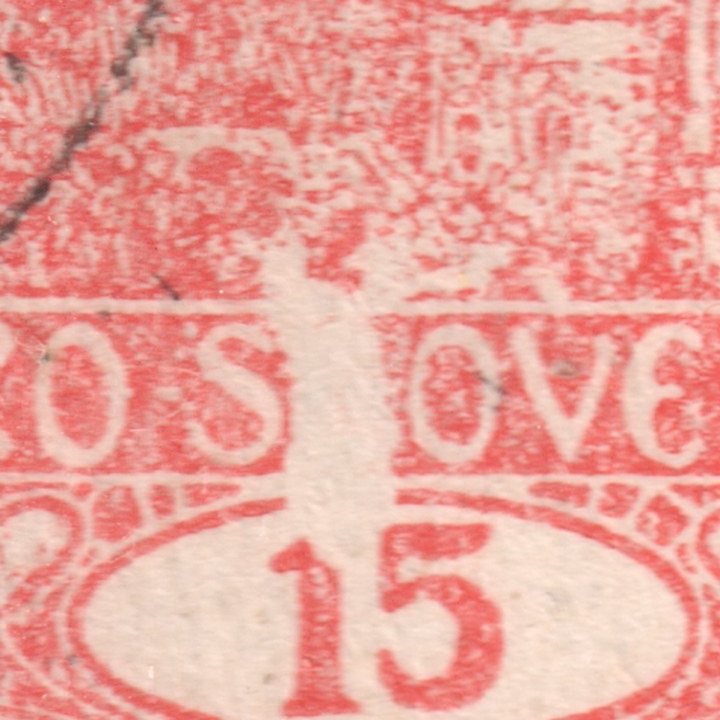
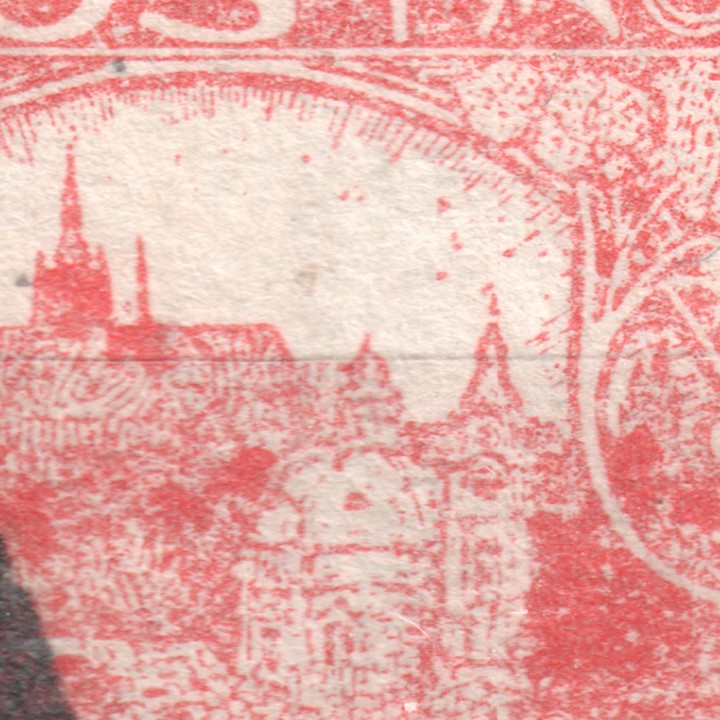
On these stamps the print is unusually weak across the whole design — the fine engraving, the garlands along the sides of the frame, the radiating hatching of the sky and the texture of the hillside below the castle are almost gone, the colour more pale pink than solid red. In the very same places where the design calls for colour — most noticeably in the fine radiating hatching of the sky above the castle — the ink has in places collected into small, solidly red dots and spots instead. The spots do not sit in the plain white areas of the design; they sit exactly where the print should be, only in a different amount.
How the flaw arose
The cause is not the amount of ink on the forme, but its consistency. Ink that is too thin does not spread evenly along fine engraved lines — mostly only a thin film reaches the paper, but wherever the thin ink collects or pools, more of it lands at once and prints as a darker dot or spot. The weak, thin print and the darker spots are therefore two symptoms of the same cause, not two independent flaws — which is why they turn up together on every copy recorded so far.
Why this is not a blank spot
A blank spot arises when a foreign object on the forme keeps ink from reaching the paper within an otherwise normally saturated print — a sharply bounded loss of colour in one isolated area. Here it is the reverse: extra colour appears in the middle of an overall under-inked print, and it appears right on the design's own lines, not away from them.
Why this is not a wandering ring
A wandering ring comes from one isolated speck on the inking roller or the forme, printing as a small spot or ring in an otherwise plain white area of the design, on just one particular sheet. Here the spots turn up across a whole series — on eleven different copies — always together with an overall weak print, and they sit on the design's own fine lines rather than in isolation in a white area.
Why this is not a smear (závoj)
A smear comes from an excess of ink on a dense, raised element of the design (most often the little heart ornament or a heavy frame line) and has a soft, blurred edge that fades gradually into white. The spots seen with thin print are, by contrast, small and fairly sharply bounded, are not tied to any particular raised element, and arise from a shortage of ink on the forme, not an excess.
Why this is not a white spot (světlina)
A světlina is a local, permanent weakening of the print tied to one particular field of the plate — it recurs at the same spot time after time, while the rest of the design stays normally saturated. Here the whole impression is weak, over the entire stamp, and the recorded copies evidently come from different sheets or fields — so this looks more like a property of a printing run or a batch of ink than of one damaged spot on the plate.
For the first seven copies neither the plate field nor the print date is known. The four imperforate copies 8–11, however, could be placed: fields 26, 27, 28 and 97 of plate II. Three of them sit side by side in one row of the plate, the fourth at the opposite end of the same plate — which points to a property of one print run or one batch of ink rather than of a particular spot on the plate. Whether the spots keep to the same place on copies from the same field cannot yet be checked — the question remains open.
Specimens from the collection
 1
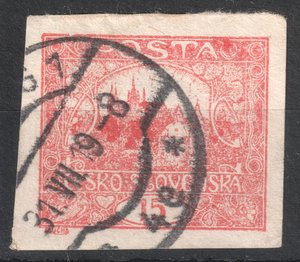
1A heavily cancelled copy; even in the gaps between the cancel strikes the pale, thin print is evident.
 2
2The garland in the left corner of the frame is almost gone, and a few small spots are scattered in the sky to the right of the towers — the detail of the faded garland below is taken from this copy.
 3
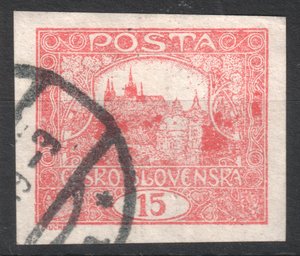
3The densest cluster of spots recorded — in the sky to the right of the towers, near the floral ornament. The detail of the spots below is taken from this copy.
 4
4A heavily cancelled copy; a few small spots still show through in the sky above the castle.
 5
5Besides fine dots in the sky it also carries a large solid spot in the upper right, below the POSTA inscription — the strongest case recorded.
 6
6Another clear cluster of fine spots in the sky to the right of the towers, near the floral ornament.
 7
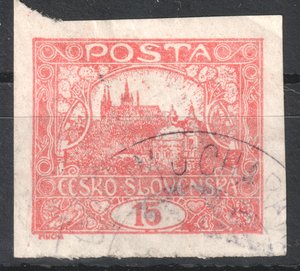
7A copy with no cancel over the upper part of the design — clearly showing the overall thin print and the fine spots in the sky.
 8
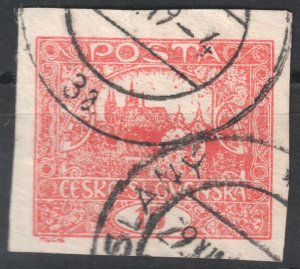
8Field 28/II, imperforate. A copy under several strikes of the Slaný cancel; even between them the print is pale over the whole surface, the sky hatching almost gone.
 9
9Field 26/II, imperforate. A single cancel strike at the left; pale, thin print over the whole design, the garlands along the sides of the frame only hinted at.
 10
10Field 97/II, imperforate. An almost clean copy — it shows the overall look of thin print best: pinkish colour, the hatching of the sky and of the hillside below the castle faded away.
 11
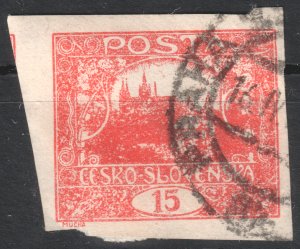
11Field 27/II, imperforate. Praha cancel at the right; pale print, the fine drawing of the hillside below the castle almost gone.
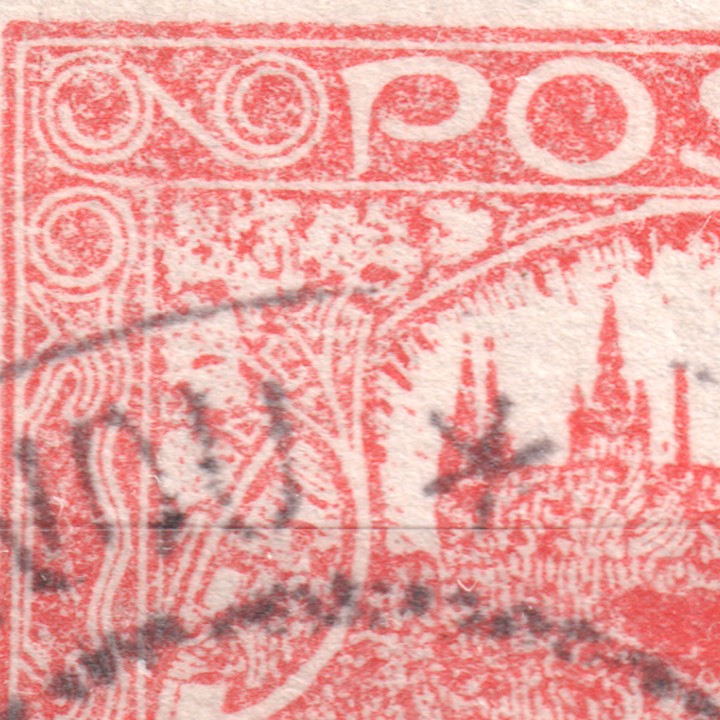
Print and set-off on the gum
The back of the stamp, the gummed side, carries the whole design. It looks like a single flaw, but it is two different ones — and a single glance at the inscription tells them apart.
How the flaw arose
A print on the gum means the sheet went into the press the wrong way up and the forme printed straight onto the gum. That this is possible at all is in itself evidence that the paper was gummed before printing. A set-off arises differently: freshly printed sheets were stacked before the ink had dried, and the wet design transferred onto the gum of the sheet lying on top of it.
The mirror test
A print on the gum is a direct impression of the forme, and so it reads the right way round, left to right, just as on the face. A set-off is a transfer from another sheet — an impression of an impression — and is therefore mirrored. Saturation helps too: a direct print has full colour and holds even the finest engraving, whereas a set-off is paler and softer, because only the ink that had not yet dried was transferred.

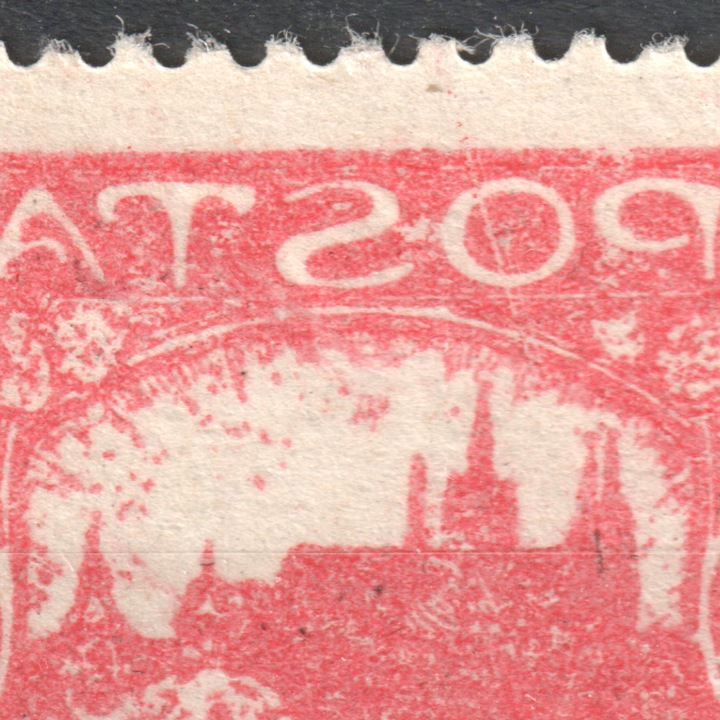
Why this is not the face print showing through
On thin paper even a proper face print shows through from the back. But a show-through image is pale and diffuse, lies exactly opposite the design on the face, and disappears when the stamp is viewed against the light from the other side. A print or a set-off on the gum lies on the surface, has a sharpness of its own and does not register with the face.
Specimens from the collection
 1
1Print on the gum. The design is on the gummed side and reads the right way round — the sheet went into the press the wrong way up.
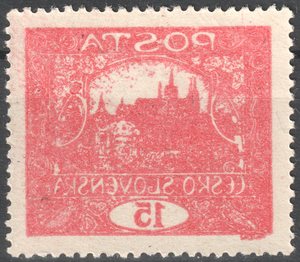 2
2Set-off on the gum. The design is mirrored — it transferred from a freshly printed sheet lying beneath.
Both flaws survive only on stamps that still have their gum. Soaking a used stamp removes the gum and with it the design on it; a print or a set-off on the gum therefore occurs almost exclusively on unused copies, and a hinge or careless cleaning can damage it beyond repair.
Torn-off ink — sheets stuck together while wet
At first glance the stamp looks like a coarsely grained, "sieved" print: hundreds of small white specks cover the whole design, the continuous lines of the spirals are broken in several places, and even the heaviest elements — the frame and the letters of POSTA — have holes. Where the ink remains, it is fully saturated. So the flaw did not arise while the ink was being applied, but after the impression: part of the fresh ink was pulled off the paper.
How the flaw arose
The Hradčany stamps were printed on paper gummed before printing (the print on the gum proves it). At the delivery end of the press the printed sheets were laid on top of one another, so the wet design of each sheet lay against the gum of the next. It was enough for the ink not to have dried, or for the pressroom to be humid, for the gum to soften and the two sheets to stick together. When they were pulled apart, the ink partly stayed where it had gripped more strongly — on the gum of the upper sheet — and white patches were left behind on the printed sheet. This copy is the lower sheet of that incident; the upper sheet would carry a mirrored set-off on its gum, of the kind shown in the previous chapter. They are the two ends of one and the same event.
Why this is not a weak impression on rough paper
In a weak impression the fine elements of the design go first — thin lines and dots — while the highest relief of the plate, the frame and the heavy letters, always prints, because it touches the paper first and with the greatest pressure. Here even the frame and the letters have holes, regardless of the strength of the element. Nor are the losses a regular fine "sand" following the texture of the paper: they are irregular patches with ragged, fibrous edges that cut across continuous lines. That is exactly what ink torn away together with the surface of the paper looks like.
Why this is neither thin print nor a světlina
In thin print the whole impression is weak and the colour pale; here the ink is normally saturated wherever it remains and the loss is abrupt, not gradual. A světlina is a local, permanent weakening tied to one field of the plate, recurring on that field; here the whole surface of the stamp is affected at once and other copies of the same field are fine — it is the incident of one sheet, not a property of the plate.
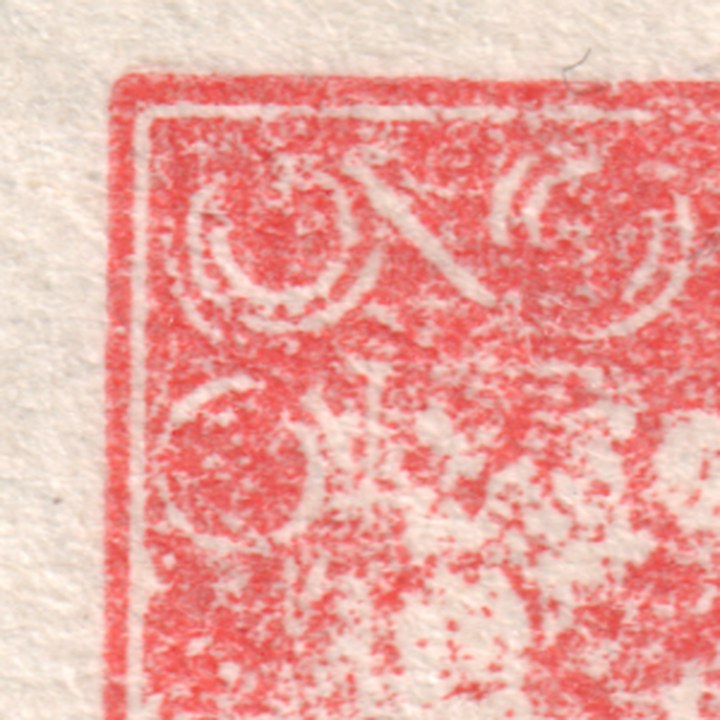
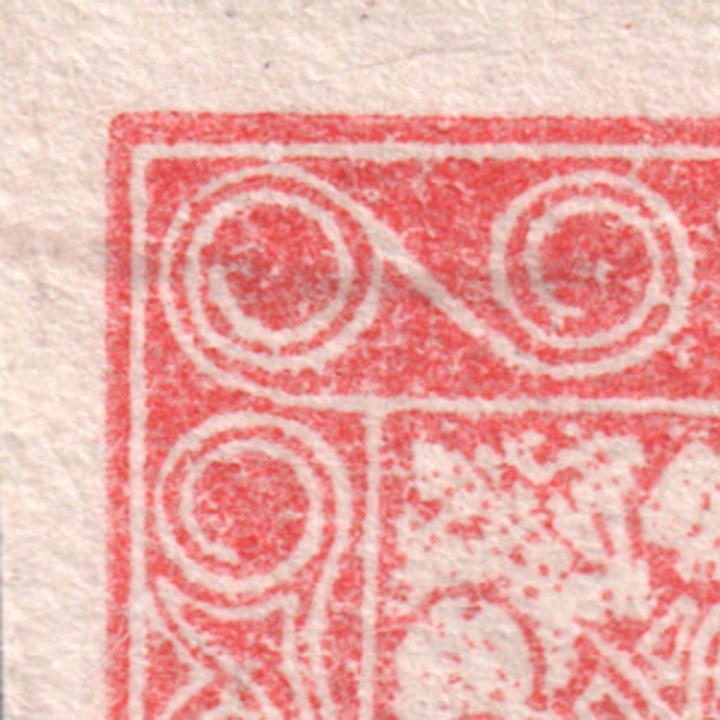
Specimens from the collection
 1
1Field 23/II. Hundreds of white specks over the whole design, frame and inscription included, the ink between them fully saturated.
 2
2Field 45/II. The same form of the flaw on another field of the same plate: ink-free patches in the frame, the letters and the design, the remaining ink saturated.
 3
3Field 55/I, imperforate. The most extensive loss recorded so far: white patches cover most of the design, the frame and both inscriptions are riddled with holes, the remaining ink fully saturated.
 4
4Field 92/II, perforation A, cancelled Poděbrady 17 IX 1919. Ink-free patches mainly in the lower half — in the inscription ČESKO-SLOVENSKÁ, the numeral and the ornaments below it; the upper part of the design is almost untouched.
 5
5Field 11/II, perforation B, cancelled Šluknov 29 IV (year illegible). A milder form of the flaw: white patches scattered over the right half of the design and in the lower corners, otherwise a saturated print.
The second copy, from field 45 of the same plate, shows the flaw in the same form — irregular patches with fibrous edges across the frame, the letters and the design, fully saturated ink between them.
Three further copies extend the record to both plates. The imperforate copy from field 55/I is the strongest case so far — the loss of ink affects almost the whole design. The perforated copies from fields 92/II and 11/II show the same flaw in a milder form, confined to part of the stamp; the copy from field 92/II also carries a legible Poděbrady cancel of 17 September 1919, so sheets were already sticking together in the first year of printing.
Two things are worth checking under a glass: whether the paper in the white spots is roughened and "furry" (the ink came away with the surface of the paper — the sheets really did stick together), and whether the gum on the back carries traces of foreign red ink (this sheet itself lay on another wet sheet). Either would confirm the stuck-sheets explanation.
Damage to the printing plate
A special case among production flaws. An ordinary constant plate flaw is in the plate from the outset and belongs to plate reconstruction — you will find those in the position gallery. This part covers only cases where the plate was damaged during use, most often while being cleaned. Such damage develops over time, so it can be divided into phases — and the phases then help to place individual copies chronologically. Two such cases are documented on the 15h.
15h – cracked printing plate at 11/II
Updated 24 June 2017
Plate cracks occur on several values of this issue, especially at marginal stamp fields where the risk of mechanical damage is naturally higher. While reconstructing the first and second plates of the 15h (POFIS no. 7) I came across a very interesting example of a cracked printing plate.
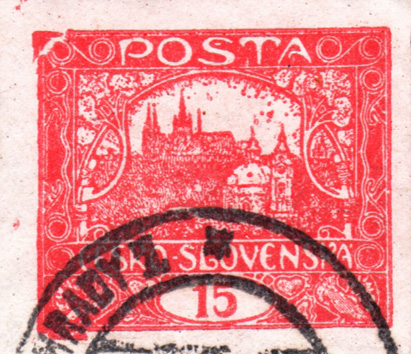
A pronounced crack of the upper-left corner occurs at field 11 of plate II. I believe it arose from damage to the plate during routine cleaning. Stamps with this damage are, in my view, scarce.





Development of the crack
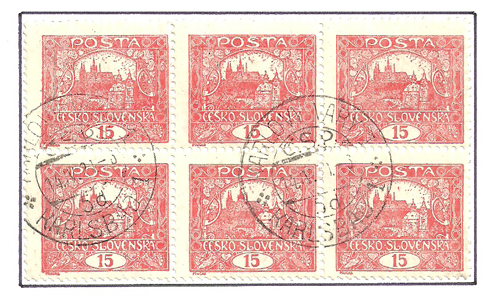
The crack developed gradually, as the images of the individual phases show:

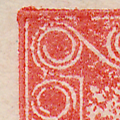
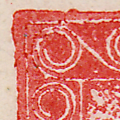
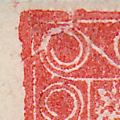
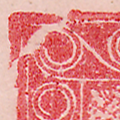
Phase 0 – intact plate · Phase 1 – faint deformation · Phase 2 – the plate shows a crack · Phase 3 – the crack grows · Phase 4 – final phase
| Perforation | Phase 0 intact plate | Phase 1 plate not yet cracked, but shows deformation | Phase 2 plate shows the crack | Phase 3 the crack grows | Phase 4 final phase of the crack |
|---|---|---|---|---|---|
| imperforate | ✓ | ✓ | ✓ | ✓ | |
| A | ✓ | ✓ | ✓ | ||
| B | ✓ | ||||
| C | ✓ | ✓ | |||
| D | ✓ | ✓ | ✓ | ||
| E | ✓ | ✓ | |||
| F | ✓ | ✓ | ✓ |
Addendum: an interesting article on this subject by Jaroslav Michalík was published on infofila.cz: infofila.cz – Hradčany: cracked printing plates.
15h – damaged frame at 60/VI
The 15h is among the most popular values of the Hradčany issue for its variability – of shades, still the subject of serious debate, as well as of the number of plates and perforation gauges.
Anyone who has reconstructed or studied the 15h plates, or focuses on plate flaws, may have come across an interesting object on the right edge of the design frame at field 60 of plate VI. The Monograph of Czechoslovak Stamps No. 1 lists this field as one with a selected plate flaw – precisely because of this object.
During reconstructions I found that the object develops. This is what 60/VI looks like on a trial print that does not yet have finished margins (one of the first trial prints of this plate):


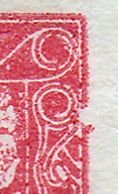
During printing, and especially during plate maintenance (cleaning?), damage may have occurred which deformed the original protrusion with noticeable consequences:

We therefore distinguish two types: the frame variant with the original protrusion is designated type I, the variant with the broken-out (deformed) frame type II.
The copies available show no further growth of the flaw – despite plate VI having printed a large number of sheets and being heavily worn towards the end. The occurrence of both types in my material is summarised in the following table:
| Perforation | Type I (protrusion) | Type II (broken-out frame) | Total |
|---|---|---|---|
| A (13¾:13½) | 2 (100 %) | 0 (0 %) | 2 |
| B (11¾) | 3 (20 %) | 12 (80 %) | 15 |
| C (13¾) | 9 (82 %) | 2 (18 %) | 11 |
| Total | 14 (50 %) | 14 (50 %) | 28 |
Type I (the protrusion) is the only one documented in perforation A and clearly prevails in line perforation C (82 %). In comb perforation B, by contrast, type II with the broken-out frame dominates (80 %). The differing ratios in the individual perforations suggest that sheets with both states of the plate reached perforation in varying order. Overall the two types come out at exactly 1:1 (14:14) — so it is not a rare flaw.
Detail of the area in both states:

Paper flaws
Creased paper
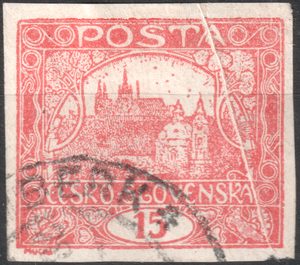
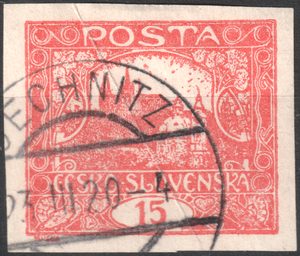
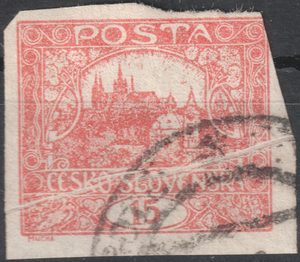
The Hradčany stamps were printed on dampened paper. A damp sheet is soft and ripples easily, and if it did not enter the press perfectly taut it gathered under pressure and a crease was left where it folded. Printing then took place over a wrinkled surface: no ink reached the fold itself, and once the sheet was flattened out the design was pulled apart. The finished stamp therefore shows a light unprinted line whose two sides do not meet — the design is interrupted and displaced there.
Why creasing happens
- The paper was dampened before printing so that it would take the ink better. A damp sheet loses its stiffness, ripples and gathers far more readily than a dry one.
- Sheets were laid into the press by hand. It was enough for one not to lie flat, or for an edge to tuck under, and the crease was there before the forme came down.
- The issue was produced in 1919 in haste and on makeshift equipment — the same reason why the other production flaws are common on the Hradčany stamps too.
- After printing the sheet dried and shrank. The crease was fixed by that and stayed in the paper even after the sheet was divided into single stamps.
Degrees of creasing
- Rippling — the paper is merely undulating, the design stays continuous and only waves slightly. The least conspicuous state.
- Crease — a thin light unprinted line crosses the design; the two sides of the design are displaced only slightly.
- Fold — the paper was laid over on itself. The unprinted band is wide, the design plainly fails to meet and the stamp looks distorted. The most telling degree and the one collectors seek.
Telling a production flaw from later damage. What decides is whether the design continues across the crease. If the crease arose before printing, ink is missing in it and the design does not meet on either side — that is a production flaw. If the paper was crumpled after printing, the design runs smoothly across the fold and only the paper is bent; that is damage, and it lowers the value instead. On multiples the evidence is strongest: a crease that passes from one stamp to the next across the gutter must have been in the sheet at the time of printing.
Specimens from the collection
Twenty-six stamps on twenty-four items — twenty-two singles, one imperforate horizontal pair (item 1) and one vertical pair (item 23). Click a specimen to enlarge it.
 1
1Imperforate horizontal pair. The crease runs across both stamps at the same height and continues over the gutter between them — it was therefore in the sheet before the stamps were separated.
 2
2A pronounced diagonal fold from the top edge to the bottom. The design is lighter along it and the two sides of the fold do not line up.
 3
3A diagonal crease across the middle of the design; under the heavy cancel it is betrayed above all by a light unprinted line.
 4
4The crease runs horizontally through the middle of the design and turns upwards at the left edge.
 5
5A long diagonal crease across the whole design, from the top left corner to the bottom right.
 6
6A crease across the whole stamp — it rises slightly to the right from the left edge and interrupts both the design and the inscription.
 7
7A diagonal crease in the right half of the stamp, from the top edge down to the inscription.
 8
8A horizontal crease across the upper part of the design, parallel with the frame.
 9
9A horizontal crease across the middle of the design.
 10
10A horizontal crease across the middle of the stamp; below it the print is noticeably lighter.
 11
11A vertical crease along the left edge, passing through the frame and the perforation.
 12
12A cut copy. A diagonal crease runs down across the design from the right edge.
 13
13A horizontal crease across the upper half of the design.
 14
14A vertical crease along the right edge; it passes through the perforation as well.
 15
15A vertical crease along the right edge and a fainter horizontal one in the upper part of the stamp.
 16
16A horizontal crease across the middle of the design, over the whole width of the stamp.
 17
17A cut copy with a vertical crease along the left edge.
 18
18Two parallel vertical creases in the right-hand part of the stamp.
 19
19A horizontal crease above the ČESKO-SLOVENSKA inscription.
 20
20A fine diagonal crease in the upper right part of the design.
 21
21A diagonal crease from the left edge towards the middle of the design.
 22
22A vertical crease in the right-hand part of the stamp and a shorter diagonal one in the top corner.
 23
23A vertical pair. The crease passes through both stamps and through the perforated gutter between them — further evidence that the creasing was already there in the sheet.
 24
24A vertical crease along the left edge, on a copy with the SO 1920 overprint (field 92/I).
Splinters and specks — a foreign object in the paper
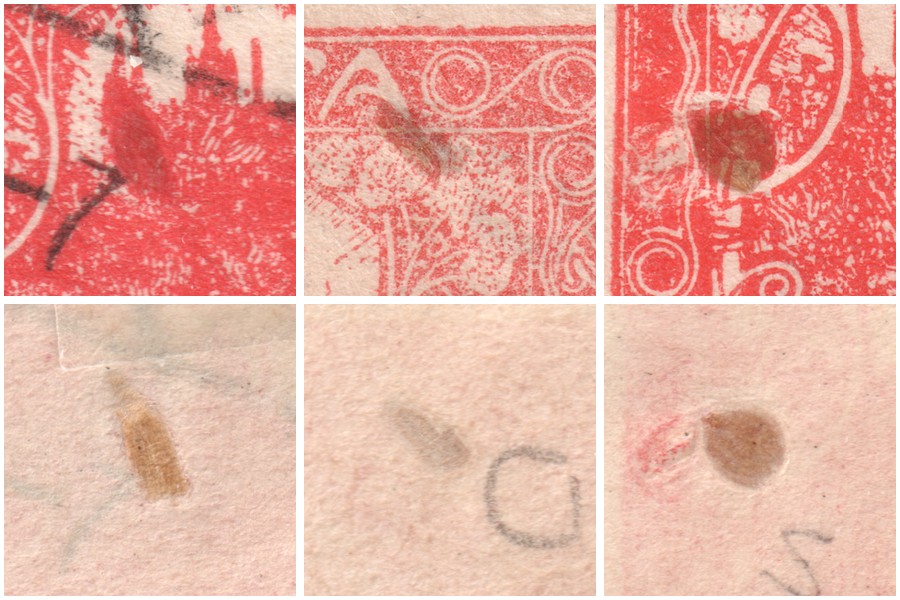
A foreign object found its way into the paper while it was being made — a fragment of wood, a piece of bark, or an unpulped fibre that survived the beating. Collectors have two names for it according to its shape: an elongated sliver is a dřívko (splinter), a small compact particle a smítko (speck). The object stayed pressed into the thickness of the sheet, and the stamp carries it to this day.
The mark of identification is that it is visible from both sides. Dirt that settled on the stamp later lies on the surface of one side. A splinter is enclosed within the paper, and so shows on the face and on the back alike — at the same place, merely mirrored.
How the flaw arose
The object entered the paper at the paper mill, long before printing — it has nothing to do with the printing forme and does not recur at the same stamp position. The issue was printed on whatever paper could be had in 1919; quality varied, and checking the raw material was not among the things that mattered most at the time. Objects in the paper are therefore fairly frequent on this issue.
Because the object was already there when the sheet was printed, the printing reacts to it. The surface is not level there and takes ink differently, so the ink does not transfer as it should: a pale halo without print tends to surround the particle, or the design is interrupted. On the back a lightened ring is sometimes visible around it — the fibres parted about the object and the paper is thinner there.
Telling it from later dirt. What decides is whether the object is in the paper or on it. An embedded particle is visible from both sides, cannot be scraped off, and the print around it is disturbed — the ink never reached it. Dirt stuck on afterwards lies on one side only, the design continues unbroken beneath it, and in raking light it stands above the surface. A larger splinter also weakens the paper: the sheet is thinner there and tears more easily, so such a copy deserves careful handling.
Specimens from the collection
For each item the face is on the left and the back of the same stamp on the right. Click a specimen to enlarge it.
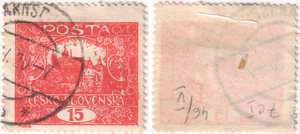 1
1The most pronounced item. A splinter not quite 2 mm long, with a visible fibrous structure. On the face it lies in the area of the Castle and the print loses its detail around it; from the back it is brown and stands slightly proud of the surface.
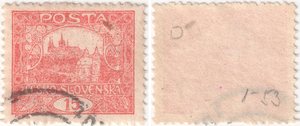 2
2A smaller elongated speck at the upper edge of the design, to the right. It crosses the frame line, which is weakened where it passes; from the back it is paler, greyish brown.
 3
3A copy with the 40 DOPLATIT surcharge. A compact speck about 1.5 mm across in the left-hand part of the design, with a distinct pale halo — the red ink never reached the object. From the back it is brown, with a lightened ring around it.
Paper foldsIn preparation.
This section grows step by step. Every kind of flaw gets its own part with a description of how it arose and with its own specimens; when a part outgrows the page it is split off into a page of its own and a summary with a link remains here — as with the white spots.